
SECURITY EMAIL PRO - HELP
Account Setup
Security Email Pro supports both Microsoft Outlook and Gmail accounts using modern OAuth 2.0 authentication. Your email password is not entered into or stored by Security Email Pro. Instead, you sign in through Microsoft or Google and authorize the app to access your email account.
Add an Account
From the left navigation bar, select the Accounts icon to open the Accounts page.
To add an email account:
- Select your email Provider.
- Enter your full Email Address.
- Enter a Display Name for the account.
- Select the + Add button.
Your default web browser will open the sign-in page for your selected email provider. Choose the appropriate account and follow the instructions provided by Microsoft or Google to authorize Security Email Pro.
After authorization is complete, the account will be added to Security Email Pro.
Your email provider may occasionally require you to sign in again or renew the app's authorization. If this occurs, simply follow the instructions displayed by your provider.
Account Order
Your email accounts are displayed in the account list. The account at the top of the list is the account that loads when Security Email Pro starts.
Use the Up Arrow button to move an account higher in the list and change the startup account.
Delete an Account
To remove an email account from Security Email Pro, select the account from the list and choose Delete.
Deleting an account from Security Email Pro removes it from the app. It does not delete your actual Gmail or Outlook email account.
Settings
From the left navigation bar, select the Settings icon to open the Settings page.
Logon and Email Read PIN
Security Email Pro uses a PIN for the initial app logon and for opening and reading individual emails.
After entering your PIN, you will be asked to set up three PIN recovery options. This is important because Quantanon does not store your PIN in the cloud or on a server. Your PIN and recovery information remain stored locally on your device.
Set up all three recovery options:
- Choose a Security Question and enter your answer.
- Enter a Recovery Email Address. This must be an Outlook or Gmail account.
- Enter a 6-character minimum Password.
Once your PIN is configured, use the available switches to choose when PIN protection is required.
The Reset PIN option can be used to remove the existing PIN information and set up a new PIN.
Email Receive and Read
Check for New Email in Minutes
Enter 0 to disable automatic checking, or enter the number of minutes between automatic checks for new email.
Play Sound with New Email Arrival
Select On to play a sound when new email arrives.
Adjust Mail Time
Enter a value other than zero if your displayed email times need to be adjusted for your location.
Display Name for Emails Sent to Self
Enter the name you want displayed when sending email to yourself.
Email Compose
Editor Default Font Size
Choose the default font size used when composing email.
Show "No Subject" Warning
Select Yes to display a warning when attempting to send an email without a subject.
Enable Right-Click Context Menu in Editor
Select Yes to enable the editor's right-click context menu. Depending on your configuration, this may obscure some formatting controls, so choose the setting you prefer.
Reply All – Any Cc Are Also Replied as Cc
Select Yes to include existing Cc recipients as Cc recipients when using Reply All.
Select Attachment Image Size
Choose whether attached images are compressed to 320, 640, or 1280, or kept at their original size. Larger images may take longer to send.
Gmail supports attachments up to 25 MB, while Outlook supports attachments up to 20 MB (depending).
Add Signature to All Emails
Select Yes and enter the signature text you want automatically added to outgoing email.
Send Encrypted Initially Checked
When enabled, the Send Encrypted option will already be selected when you create a new email.
Security Related
Email Messages Read Mode
Choose how email messages are displayed. Text Only provides the safest viewing mode, but images and other HTML content will not be displayed.
Clicked Link UTM Parameter + Cleaning
Enable this option to clean tracking and other unnecessary parameters from links before they are opened.
On Clicked Links – Show Browser Options
When enabled, selecting a link displays a list of available installed browsers so you can choose where to open it.
Show Attachment Suspicious Extension Alert
When enabled, Security Email Pro displays a warning when an attachment has a potentially suspicious file extension, giving you an opportunity to examine the email before opening the attachment.
Contacts
Security Email Pro includes a built-in contact manager for creating and organizing individual contacts and contact groups.
From the left navigation bar, select the Contacts icon to open the Manage Contacts page.
Individual Contacts
Create a Contact
To add a new contact:
- Select an email address from the list, or enter one manually.
- Enter a Display Name for the contact.
- Select Add Contact.
You can also right-click an email address and select Add Contact to quickly add the person to your contacts.
Edit a Contact
To edit an existing contact:
- Right-click the contact in the list.
- Select Edit Contact.
- Make the desired changes.
- Select Edit Contact to save them.
Delete a Contact
To remove a contact:
- Right-click the contact in the list.
- Select Delete.
- Confirm the deletion when prompted.
A contact can also be added directly from the Compose page. Select Add Contact, enter the contact information, and choose whether the contact should automatically be added to the email recipient list.
Contact Groups
Contact groups make it easy to organize multiple contacts and address an email to the entire group from the Compose page.
Create a Contact Group
- Select the Group Names tab.
- Select + Add and enter a name for the group.
- Select the new group.
- Select one or more contacts from the contact list.
- Select Add Group.
Delete a Contact Group
- Select the Group Names tab.
- Select the group you want to remove.
- Select Delete.
Deleting a group removes the group itself but does not delete the individual contacts contained in it.
Add Contacts to a Group
- Select the group from the Group Names list.
- Select the contacts you want to add.
- Select Add Group.
Viewing and Editing Groups
In the Contacts list, contacts belonging to a group are displayed together, with the group name shown in bold.
Edit a Group
- Select the group from the Contacts list.
- Right-click and choose Edit Contact.
- Make the desired changes.
- Select Edit Contact to save them.
Delete a Group
- Select the group from the Contacts list.
- Right-click and choose Delete.
- Confirm the deletion.
- Select Delete to complete the process.
End to End Encryption
From the left navigation bar, select the Encryption Keys icon to open the Encryption Keys page.
Overview
Security Email Pro provides end-to-end encryption (E2EE) for supported email content. A message is encrypted on the sender's device and remains encrypted until it is decrypted on the recipient's device.
Security Email Pro uses a combination of symmetric and asymmetric encryption. Your personal encryption keys are created and managed on your device rather than being generated for you by a remote key-management service.
Public keys are exchanged directly between Security Email Pro users. Your Public Keys may be shared with contacts, while your Private Keys must remain private.
Security Email Pro uses modern cryptographic algorithms designed to provide protection against both conventional and future quantum-computing attacks.
Encryption Terms
Symmetric Encryption
Symmetric encryption uses the same secret key to encrypt and decrypt data and is well suited for efficiently encrypting larger amounts of information.
Security Email Pro generates a strong, random, one-time symmetric key for encrypting the email message and supported attachments.
Asymmetric Encryption
Asymmetric encryption uses a matched Public Key and Private Key pair. Information encrypted with a Public Key can be decrypted only with the corresponding Private Key.
Security Email Pro uses the recipient's Public Key to protect the symmetric key used for the message. The recipient's corresponding Private Key is then used to recover that symmetric key so the message can be decrypted.
How Security Email Pro E2EE Works
Each user creates a Personal Key Set containing matched Private and Public Keys.
The Public Keys can be shared with contacts. The Private Keys remain under the user's control and are not distributed to contacts.
When sending an encrypted email:
- Security Email Pro generates a random symmetric key and uses it to encrypt the message and supported attachments.
- The symmetric key is protected using the recipient's Public Key.
- The encrypted message and protected symmetric key are sent to the recipient.
- The recipient's Private Key is used to recover the symmetric key.
- The symmetric key is then used to decrypt the message and supported attachments.
This process occurs automatically once the users have exchanged their Public Keys.
Example: Bob Sends an Encrypted Email to Jane
Before Bob can send Jane an encrypted message, he needs Jane's Public Keys.
Jane Creates and Shares Her Keys
- Jane opens Encryption Keys and selects Key Sets – Personal Email Accounts.
- She selects her email account and chooses Create Key Set.
- Security Email Pro creates and securely stores her Personal Key Set.
- Jane creates this Personal Key Set only once for that email account.
- She selects Public Keys – Export To Contacts.
- She selects Bob and the Public Key Set she wants to share.
- She selects Export.
- Bob receives an email containing the encrypted Public Key Set attachment.
- Bob opens the email and selects Import Key Set.
- Jane's Public Keys are now available to Bob for encrypted email.
Jane will also need Bob's Public Keys before she can send encrypted email to him.
Bob Sends Jane an Encrypted Message
- Bob selects New to create an email and then selects Contacts.
- Jane's name displays a lock icon, indicating that her Public Keys are available.
- Bob composes the message and adds any supported attachments.
- He selects Send Encrypted.
- Bob selects Send Email.
- Jane receives the encrypted message, which Security Email Pro decrypts using her keys.
- The message status area displays the decryption and digital-signature verification results.
Encryption Keys Window
Key Sets – Personal Email Accounts
This tab is used to create and manage your Personal Key Sets.
Create one Personal Key Set for each email account. Do not create a different Personal Key Set for the same email address on each of your devices. Using the same keys allows encrypted communication with your contacts to work consistently across your devices.
Create a Personal Key Set
- Select the desired email account.
- Select Create Key Set.
- The new Key Set appears in the listing.
- The listing displays the associated Private Keys, Public Keys, and digital signatures.
- Digital signatures can be compared between devices to verify that the keys match.
- Do not create another Personal Key Set for the same email address on another device.
When you create a Personal Key Set, its Public Keys also appear under Public Keys – Import From Contacts. This allows you to send encrypted email to yourself.
Export a Personal Key Set to Another Device
Use this feature when you use Security Email Pro on more than one of your own devices. Each device should use the same Personal Key Set for a particular email account.
- Enter a password of at least 16 characters. Remember this password; Security Email Pro does not save it.
- Select the desired Personal Key Set.
- Select Export.
- An email containing the encrypted PersonalKeySetEnc.json attachment is sent to the selected account.
- Open that email on your other device.
- Enter the password you created for the export.
- Select Import Key Set.
Your Personal Key Set is now available on the additional device.
Delete a Personal Key Set
A Personal Key Set normally should not be deleted.
Deleting it can prevent you from decrypting previously encrypted messages associated with those keys. Contacts who have your existing Public Keys would also need to replace them with your new Public Keys.
If you intentionally delete a Personal Key Set, you will need to create a new one and exchange the new Public Keys with your contacts.
Personal Key Set Listing
The listing displays your Personal Key Sets and their associated keys and digital signatures.
Important Read Me
Read the Important Read Me information before creating, importing, exporting, or deleting encryption keys.
Public Keys – Export To Contacts
After creating your Personal Key Set, share your Public Keys with each contact from whom you want to receive encrypted email.
Your contacts use your Public Keys when encrypting messages to you. Your Private Keys are then used on your device to decrypt those messages.
Likewise, a contact must share their Public Keys with you before you can send encrypted email to that person.
Export Public Keys to a Contact
- Select the desired contact.
- Select the Public Key Set you want to share.
- Select Export.
- The exported Public Key information appears in the listing.
Exported Public Keys Contact Listing
This listing shows the contacts to whom you have exported your Public Keys.
Public Key Listing
This listing displays the Public Keys available for export. Select the appropriate set before exporting it to a contact.
Important Read Me
Read the Important Read Me information before exporting Public Keys.
Public Keys – Import From Contacts
This tab displays Public Key Sets that you have imported from your contacts.
A contact whose Public Keys are available can receive encrypted email from you. Security Email Pro uses that contact's Public Keys when encrypting the information required for the recipient to decrypt the message.
Your own Public Keys also appear here so that you can send encrypted email to yourself.
Imported Public Key Listing
The listing shows the Public Key Sets currently available to Security Email Pro.
If you delete a contact's Public Keys, you will no longer be able to send encrypted email to that contact until the appropriate Public Keys are imported again.
Normally, a contact's Public Keys should be replaced only when that person has intentionally created a new Personal Key Set.
Important Read Me
Read the Important Read Me information before importing or deleting Public Keys.
About Public Key Sharing
Security Email Pro keeps Public Key exchange straightforward while allowing users to manage their own encryption keys.
To share Public Keys, select the contact and appropriate Public Key Set and choose Export. The recipient receives the Public Key Set by email and selects Import Key Set.
Once both users have exchanged their Public Keys, Security Email Pro can handle the encryption and decryption process during normal email use.
Compose
To create a new email, select + New in the upper-left corner. The Compose window will open.
Send, Encrypt, Save, or Cancel
Send Email
Select when your message is ready to send.
Send Encrypted
Select this option to send the message using Security Email Pro's end-to-end encryption.
Contacts whose Public Keys have been imported display a small lock icon in the contact list, indicating that encrypted email can be sent to them.
If one or more recipients do not have the required encryption keys, Security Email Pro will display a warning before sending. You can cancel the message or continue, in which case those recipients will receive the message without end-to-end encryption.
Draft
Saves the current unsent message to your Drafts folder.
Cancel
Closes and cancels the current composed message.
Reply and Expiration Options
Reply By Date
Select this option and choose a date when you want to request a reply by a particular date.
Expire on Date
Select this option and choose a date after which the recipient will no longer be able to view the message normally.
Expiring messages cannot be forwarded, viewed with the standard email header, or saved as an HTML file. The message includes a Secured Message watermark and is encrypted to prevent normal viewing in another email client or web browser.
Recipients
Email Send Type
Choose whether recipients are added as To, Cc, or Bcc.
You can change an individual recipient's type by right-clicking the contact and selecting the desired option.
Contacts
Opens your contact list. Select one or more contacts and choose Add Contact(s).
Group Contacts
Opens your saved contact groups. Select a group to add its contacts to the recipient list.
Contact groups are created and managed from the Manage Contacts page.
Recipient Count
Displays the number of recipients currently included in the message.
+ New Contact
Creates a new contact and adds that person to the current email and your contact list. The contact can later be edited from Manage Contacts.
Recipient List
The recipient list displays everyone currently included in the message.
Right-click a recipient to change the send type between To, Cc, and Bcc.
Left-click a recipient to remove that person from the message.
Subject, Snippets, and Placeholders
Use Snippet and Placeholder to insert predefined text into the Subject line.
You can create and manage subject snippets and placeholders from the Snippets – Placeholders page in the left navigation bar.
Message Editor
The message editor provides formatting controls and options for creating your email.
Three tabs are available:
Compose
Create and format your email message.
From the Compose tab you can also:
- Add a signature, snippet, or placeholder.
- Add an attachment.
- Add a system file to send to another of your devices.
- View the attachment size. Keep the total attachment size within the limits supported by your email provider.
AI
Select an available AI assistant to help compose your message. When finished, copy the generated text and return to the Compose tab to continue editing it.
AI Help
Provides additional information about using the AI features.
Add Attachments
Security Email Pro provides two ways to add attachments:
- Select Browse and choose the files you want to attach.
- Drag and drop files directly into the message editor area.
Send a Clickable Link
Security Email Pro provides two quick ways to insert a webpage address as a clickable link.
Method 1 – Paste and Convert
- In your browser, copy the desired webpage address.
- Paste the address into the message editor.
- Select the entire URL.
- Select Text to Link.
- The URL is converted into a clickable link for the recipient.
If the URL is the only content in the message, Select All can be used. Otherwise, select only the URL you want converted.
Method 2 – Paste URL
- Copy the desired webpage address from your browser.
- In the message formatting bar, select Paste URL.
- The copied address is inserted as a clickable hyperlink.
Link Cleaning
Link Cleaning can be enabled under Settings → Security Related.
When enabled, Security Email Pro removes recognized tracking parameters from supported URLs before the link is used. These parameters are commonly added to links for advertising, social-media, and analytics tracking.
For example, a URL containing numerous tracking parameters may be reduced to the underlying webpage address while leaving the destination itself unchanged.
This helps reduce unnecessary tracking information when links are shared with others.
Placeholders
From the left navigation bar, select the Snippets, Signatures, and Placeholders icon to open the page.
Placeholders are reusable fields that can be inserted into an email Subject or Message Body. When the email is sent, Security Email Pro replaces each placeholder with its current or selected value.
Security Email Pro includes five System Placeholders that are always available. You can also create your own placeholders using the Placeholder Factory.
System Placeholders
[FirstName]
Inserts the recipient's first name.
[LastName]
Inserts the recipient's last name.
[DateToday]
Inserts the current date.
[EnteredDate]
Allows you to select a date to insert into the email.
[EnteredTime]
Allows you to select a time to insert into the email.
When [EnteredDate] or [EnteredTime] is used, Security Email Pro displays a selection control so you can choose the desired date or time.
User-Created Placeholders
The Placeholder Factory allows you to create your own placeholders and specify the text or value that will replace them when used.
Create a Placeholder
- Select the Placeholder Factory tab.
- Select Create.
- Enter a name for the placeholder.
- Enter the Runtime Value that should be inserted when the placeholder is used.
- Select + Add Placeholder.
Edit a Placeholder
Only user-created placeholders can be edited.
- Locate the desired placeholder in the placeholder listing.
- Right-click the placeholder and select Edit.
- Change the Name and/or Runtime Value.
- Select Edit to save your changes.
Delete a Placeholder
Only user-created placeholders can be deleted.
- Locate the desired placeholder in the placeholder listing.
- Right-click the placeholder.
- Select Delete.
Signatures and Snippets
From the left navigation bar, select the Snippets, Signatures, and Placeholders icon to open the page.
Signatures
Signatures are pre-written text that can be quickly added to the end of an email message. You can create multiple signatures and select the one you want when composing an email.
Create a Signature
- Select the Signature tab.
- Select Create.
- Enter the desired signature text and give it a Title.
- Select + Add.
- The new signature will appear in the signature listing.
Edit a Signature
- Locate the desired signature in the listing.
- Right-click the signature and select Edit.
- Make the desired changes.
- Select Edit to save them.
Delete a Signature
- Locate the desired signature in the listing.
- Right-click the signature.
- Select Delete.
Snippets
Snippets are reusable pieces of text that can be inserted into an email whenever needed.
Security Email Pro provides two types of snippets:
Subject Snippets — Reusable text for the email Subject line.
Message Body Snippets — Reusable text that can be inserted into the body of an email.
Subject Snippets
Create a Subject Snippet
- Select the Subject tab.
- Select Create.
- Enter a Title for the snippet.
- Enter the desired text.
- Select + Add.
- The new snippet will appear in the Subject Snippets listing.
To use a Subject Snippet while composing an email, select the Snippet and Placeholder option for the Subject line, choose the desired snippet, and insert it.
Edit a Subject Snippet
- Locate the desired snippet in the Subject Snippets listing.
- Right-click the snippet and select Edit.
- Make the desired changes.
- Select Edit to save them.
Delete a Subject Snippet
- Locate the desired snippet in the Subject Snippets listing.
- Right-click the snippet.
- Select Delete.
Message Body Snippets
Create a Message Body Snippet
- Select the Message Body tab.
- Select Create.
- Enter a Title for the snippet.
- Enter the desired reusable text.
- Select + Add.
- The new snippet will appear in the Message Body Snippets listing.
To use a Message Body Snippet while composing an email, select the Snippet and Placeholder option in the message editor, choose the desired snippet, and insert it at the desired location.
Edit a Message Body Snippet
- Locate the desired snippet in the Message Body Snippets listing.
- Right-click the snippet and select Edit.
- Make the desired changes.
- Select Edit to save them.
Delete a Message Body Snippet
- Locate the desired snippet in the Message Body Snippets listing.
- Right-click the snippet.
- Select Delete.
Read Email
Email Listing
Emails are displayed in the message listing and are color-coded to help identify their status:
Blue — New
Black — Read
Select and Manage Email
The app opens in Read Mode, where you can select and read individual messages.
Left-click an email to read it.
Right-click an email to display available actions:
- Delete
- Archive
- Spam
- Mark Unread
- Flag
- Unflag
An Archive folder is automatically available for each email account.
To work with multiple messages, switch to Select Mode using Check Mark at the top of the email listing. Select the desired emails and choose an available action:
- Delete
- Archive
- Move
- Spam
- Mark Unread
- Mark Unread
I notice your original actually appears to have Mark Unread twice in that multi-select list. If one of those should be Mark Read, correct it here. Otherwise, remove the duplicate.
Controls Above the Email Message
When reading an email, the following actions are available:
Delete
Deletes the current email and moves it to the Deleted/Trash folder.
Move
Moves the email to another folder.
Archive
Moves the email to the Archive folder.
Reply
Creates a reply to the sender.
Forward
Forwards the email to recipients you choose.
Reply All
Creates a reply to everyone included in the original email.
Mark as Spam
Moves the message to your Spam folder. Your email provider may remember this action for future messages.
Mark Unread
Changes the message status to Unread.
Flag
Marks the email as important and displays a flag in the email listing.
Unflag
Removes the Important flag.
View Header
Displays the full email header and IP-related information for additional message examination.
Save HTML File
Saves the current email content as an HTML file with a filename you choose.
Tracking Pixel and Sender Status
This area displays information about tracking pixels and the sender.
If a tracking pixel is detected, Security Email Pro displays the Tracking Pixel Found status and provides an Unblock option.
If tracking pixels are found in a message, their locations are identified within the message content.
When you choose Unblock, the sender can be added to the Pixel Safe Sender list to prevent future blocking for that sender. To manage this list, select Pixel Track from the left navigation bar and then select Pixel Track.
Add Sender to Contacts
Select this option to quickly add the message sender to your contact list.
You can review and edit the contact later from Manage Contacts.
Tasks
Select this option to create a task related to the current email.
The task can be reviewed and edited later from the Tasks/Reply Requests page.
Reply Reminder
Use Reply Reminder when you want to remind yourself to respond to an email on or before a particular date.
Select the reminder date and the email will appear in the Tasks/Reply Requests list with a reminder indicator.
Task and Reply Status
This area displays the current status of tasks and reply reminders associated with the email.
Status indicators may include:
Future — Scheduled for a future date
Today — Due today
Past — The selected date has passed
When a message has an associated Today task or reply request, the corresponding indicator in the email listing is displayed in yellow.
Message Authentication
Security Email Pro checks available email authentication results when a message is opened. These checks can help identify spoofing and impersonation, which are commonly used in phishing emails.
The authentication status is displayed above the + Sender to Contacts button.
PASSED — Authentication checks passed and are displayed in green.
FAILED — One or more authentication checks failed and are displayed in red, along with additional information when available.
Authentication Methods
SPF – Sender Policy Framework
SPF checks whether the server that sent the message is authorized to send email for the domain being evaluated. The domain owner publishes the authorized sending information through DNS.
DKIM – DomainKeys Identified Mail
DKIM uses a digital signature to help verify that a message was authorized by the signing domain and that signed portions of the message were not modified after the signature was applied.
DMARC – Domain-based Message Authentication, Reporting and Conformance
DMARC works with SPF and DKIM and allows a domain owner to publish a policy describing how messages that fail authentication should be handled. DMARC also checks whether the authenticated domain aligns with the domain shown to the recipient.
CompAuth – Microsoft Composite Authentication
For supported Microsoft messages, Composite Authentication combines multiple authentication signals and other information to provide an additional assessment of the message. When available, Security Email Pro displays the resulting status.
Important
A successful authentication result does not guarantee that an email is safe. A legitimate or compromised account can still send malicious content. Likewise, an authentication failure does not always mean that a message is malicious; forwarding and some email configurations can affect authentication results.
Use the authentication information together with the sender, message content, links, and attachments when evaluating an email.
For additional technical information about a message, select View Header from the controls above the email.
Folder Management
From the left navigation bar, select the Folders icon to open the Folders page.
Create a Folder
- Select the Create Folder tab.
- Enter a name for the new folder.
- To create the folder inside another folder, select Create as subfolder under and choose the desired parent folder.
- Select + Create.
Rename a Folder
- Select the Rename Folder tab.
- Select the folder you want to rename.
- Enter the new folder name.
- Select Rename.
Delete a Folder
- Select the Delete Folder tab.
- Select the folder you want to delete.
- Select Delete.
Important: Deleting a folder will also delete the emails contained in that folder. Be certain that you no longer need those messages before deleting the folder.
Enable Additional System Folders
Some email providers include system folders that are not commonly used. Security Email Pro allows you to enable these folders when you want them displayed.
Outlook
- Scheduled
- Notes
Gmail
- All Mail
- Important
- Starred
- Scheduled
Labels
System Labels
Security Email Pro automatically creates and maintains several useful labels. You do not need to manually add email addresses to these labels.
Attachments
Displays emails that contain one or more attachments.
Expiry
Displays emails associated with an expiration date.
Flagged
Displays emails that you have flagged.
Follow Ups
Displays emails that have been marked for follow-up.
Requested Replies
Displays emails for which a reply has been requested.
Self
Displays emails associated with your own email address.
System Labels appear automatically when matching messages are available.
User Labels
User Labels allow you to create your own categories and assign email addresses to them.
For example, you might create labels for Family, Friends, Work, Shopping, or any other category useful to you.
When you select one of your User Labels from the Groups button above the email listing, Security Email Pro displays messages associated with the email addresses assigned to that label.
User Label Address Listing
This listing displays the email addresses currently assigned to your User Labels, along with their associated label names.
To remove an email address from a label:
- Select the desired email address.
- Select Delete.
This removes the address from the label but does not delete the email address, contact, or any email messages.
Manage User Labels
Create a Label
- Enter the desired label name.
- Select Add.
Delete a Label
- Select the desired label from the listing.
- Select Delete.
Add an Address to a User Label
Use Group An Address to assign an email address to one of your User Labels.
- Select the desired email address from the drop-down list.
- Select the User Label you want to assign it to.
- Select Add.
The email address is now associated with that label. When the label is selected from the Groups button above the email listing, matching messages will be displayed.
AutoSort
AutoSort allows Security Email Pro to automatically move incoming emails to a selected folder, bypassing the Inbox.
This can help organize incoming email and keep your Inbox less cluttered.
From the left navigation bar, select the AutoSort icon to open the AutoSort page.
Add an AutoSort Action
You can create an AutoSort action based on either a specific Email Address or an entire Domain.
Sort by Email Address
Use this option when you want emails from a specific sender to be automatically moved to a selected folder.
- Select Email Address.
- Select an email address from the drop-down list or enter the address manually.
- Select the destination folder.
- Select Add.
Sort by Domain
Use this option when you want emails from an entire domain to be automatically moved to a selected folder.
- Select Domain.
- Enter the domain using the format *@domainname.com.
- Be sure to include *@ before the domain name.
- Select the destination folder.
- Select Add.
After an AutoSort action is created, it will appear in the AutoSort listing.
Delete an AutoSort Action
- Select the desired AutoSort action from the listing.
- Select Delete.
Once deleted, new messages matching that address or domain will no longer be automatically moved by that AutoSort action.
Calendar and Tasks
Security Email Pro includes a built-in task and calendar system for keeping track of tasks, follow-ups, and reply requests. Tasks can be viewed in both List View and Calendar View.
From the left navigation bar, select the Tasks – Reply Requests icon to open the Tasks page.
Create a Task
- Select the Create – View – Select Tasks tab.
- Enter a Task Title.
- Enter the Task Details.
- Select the desired Date and Time.
- Select + Add Task.
The new task will appear in List View, and its date will be identified in Calendar View.
Create a Task from an Email
You can also create a task directly from an email you are reading.
Select + Task from the Read Email controls. The task will be associated with that email and can later be viewed and managed from the Tasks – Reply Requests page.
Task Status Colors
Tasks are color-coded in List View according to their date:
Blue — Future
The task is scheduled for a future date.
Red — Today
The task is due today.
Dark Gray — Past
The task date has passed.
Edit a Task
- Locate the desired task in List View.
- Right-click the task and select Edit Task.
- Change the Details, Date, or Time as needed.
- Select Edit Task to save your changes.
Delete a Task
- Locate the desired task in List View.
- Right-click the task and select Delete.
Task Notifications
Security Email Pro displays task status indicators in the main email window so you can quickly see when tasks require attention.
Task Due Today
When a task is due today:
- The Tasks – Reply Requests icon in the left navigation bar turns yellow.
- The Task Today indicator in the lower-right area displays a red check mark.
Future Task
When a future task is available, the Task Future indicator displays a blue check mark.
Past Task
When a task is past its scheduled date, the Task Past indicator displays a dark gray check mark.
Reply Requests and Reminders
Security Email Pro helps you keep track of emails that require a reply or emails that you want to remember to reply to later.
There are two types of reply tracking:
Reply Requests — Used when sending an email to request a reply from the recipient by a selected date.
Reply Reminders — Used on received emails to remind yourself to reply by a selected date.
Reply Requests
Reply Requests are created when composing a new email.
In the Compose window, select Request Reply By and choose the desired date before sending the message.
The recipient's email will include the reply request information. In Security Email Pro, the message is also identified with a notification indicator so the request can be tracked.
Reply Reminders
Reply Reminders are created from an email you have received.
While reading the email, select + Reply Reminder and choose the date by which you want to reply.
The message will then be included in your Reply Requests and Reminders listing and identified with a notification indicator.
Manage Reply Requests and Reminders
From the left navigation bar, select the Tasks – Reply Requests icon and then select the Replies Needed tab.
The listing displays your reply requests and reminders according to their status.
Reply Status Colors
Blue — Future
The reply date is in the future.
Red — Today
The reply is due today.
Dark Gray — Past
The reply date has passed.
Edit a Reply Reminder
The due date can be changed for a Reply Reminder.
- Locate the desired reminder in List View.
- Right-click the reminder and select Edit Reply.
- The Edit Reply tab displays the associated email and current due date.
- Select a new date.
- Select Edit Due Date to save the change.
Delete a Reply Request or Reminder
- Locate the desired item in List View.
- Right-click the item and select Delete.
Reply Notifications
Security Email Pro displays reply-status indicators in the main email window so you can quickly see when replies require attention.
Reply Due Today
When a reply is due today:
- The Tasks – Reply Requests icon in the left navigation bar turns yellow.
- The Reply Today indicator in the lower-right area displays a red check mark.
Future Reply
When a future reply is scheduled, the Reply Future indicator displays a blue check mark.
Past Reply
When a reply date has passed, the Reply Past indicator displays a dark gray check mark.
Ad Server Tracking and Host Files
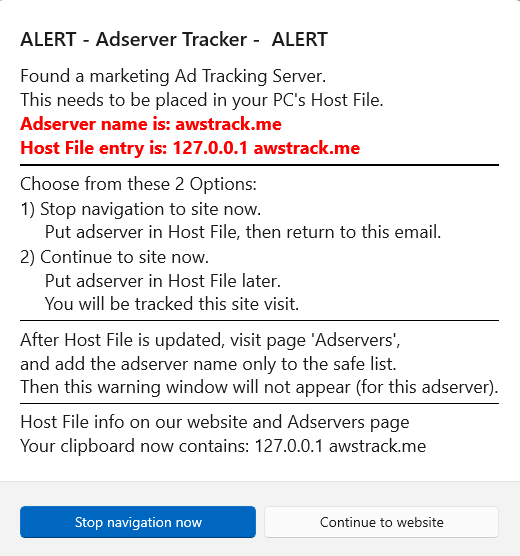
Links in email messages can contain references to advertising, analytics, and tracking services. When you click a link, Security Email Pro can check the destination for recognized ad-server and tracking hosts before allowing navigation to continue.
This provides an additional opportunity to identify tracking associated with links contained in email messages.
Ad Server Alert
If Security Email Pro detects a recognized ad-server or tracking host in a clicked link, an Ad Server Alert is displayed.
The alert identifies the detected host and provides options to:
Stop Navigation
Cancels navigation and returns you to the email.
Continue to Website
Continues to the requested website.
Use the information in the alert to decide whether you want to continue.
Host File
Security Email Pro uses a Host File containing known advertising and tracking hosts.
When a host contained in this file is detected during link navigation, Security Email Pro can display the Ad Server Alert.
The Host File can be updated so that newly identified hosts can be added as needed.
Identify a Host
Sometimes you may want to determine which host or IP address is associated with a particular link.
Windows includes tools that can help examine network information. One option is Resource Monitor:
- Open Windows Search.
- Search for Resource Monitor and open it.
- Select the Network tab.
- Use the network information displayed to examine connections associated with the website you are investigating.
Because websites frequently use multiple servers, content-delivery networks, advertising services, and other third-party resources, not every displayed connection necessarily belongs directly to the website itself.
IP Address Information
If you have identified an IP address and want additional information about it, you can use an IP lookup service to determine information such as the associated network or organization.
Keep in mind that IP addresses can be shared, reassigned, or associated with cloud and content-delivery services, so an IP lookup does not necessarily identify the actual operator of a website or tracker.
Ad Server Page
From the left navigation bar, select the Ad Servers icon to open the Ad Servers page.
This page displays the advertising and tracking hosts currently stored in Security Email Pro's Host File.
Add an Ad Server Host
To manually add a host:
- Enter the host name without the
127.0.0.1prefix. - Select Add.
The new host will be added to the Host File and included in future link checks.
Tracking Pixels
Some marketing and other HTML emails contain tracking pixels—small remote images that can notify an external server when email content is loaded. Depending on how the tracking system is configured, this can provide the sender with information associated with opening the message. Often times, the media refers to these as Spy Pixels.
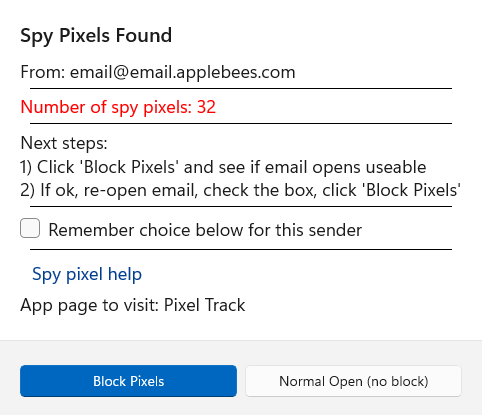
Security Email Pro checks opened emails for recognized tracking pixels and alerts you when they are detected.
Tracking Pixel Alert
When tracking pixels are found, Security Email Pro displays an alert showing the sender and the number of detected tracking pixels.
You can choose:
Block Pixels
Blocks the detected tracking pixels from loading.
Normal Open (no block)
Opens the email normally and allows its remote content to load.
Remember Your Choice
Select Remember choice below for this sender if you want Security Email Pro to use the selected action automatically for future emails from that sender.
For example, if you trust a sender and want their messages to open normally, Security Email Pro can remember that choice. You can also choose to automatically block tracking pixels from a particular sender.
If Blocking Affects the Email
Blocking tracking pixels may occasionally prevent other remote content in the message from displaying as expected.
If an email does not display properly after selecting Block Pixels, reopen the message and choose Normal Open (no block) if you trust the sender and want the remote content displayed.
You can then choose whether Security Email Pro should remember that setting for future messages from the sender.
Tracking Pixel Status
When reading an email, the tracking-pixel status is displayed in the status area below the message.
This allows you to see whether tracking pixels were detected and how Security Email Pro handled them.
Change a Sender's Pixel Setting
You can change a previously saved tracking-pixel action for a sender in either of two ways:
- Right-click an email from that sender in the email listing and change the pixel action.
- Open Pixel Track from the left navigation bar and change the saved setting for the sender.
Any updated setting will be used for future emails from that sender.
Phish Scanning
Security Email Pro automatically examines the text of opened emails for words and phrases commonly associated with phishing and fraudulent messages.
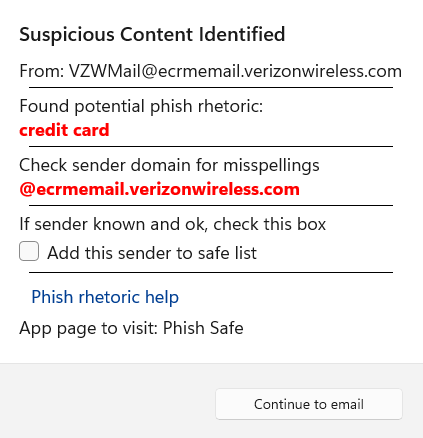
When suspicious content is detected, Security Email Pro displays a warning identifying the text that triggered the alert.
Suspicious Content Alert
The alert displays the sender and the potentially suspicious wording found in the message.
Phishing detection is intended as an additional warning. The presence of suspicious wording does not necessarily mean that an email is fraudulent, and the absence of a warning does not guarantee that an email is safe.
When an alert appears, examine the sender's email address, message content, links, attachments, and authentication results before deciding whether to trust the message.
Check the Sender Address
Phishing messages sometimes use email addresses or domains that closely resemble those of legitimate organizations.
Look carefully for:
- Misspelled company or domain names
- Added, missing, or substituted letters
- Unexpected domains
- Sender addresses that do not match the organization represented in the message
For example, a fraudulent address might differ from a legitimate address by only one character.
Add a Trusted Sender to the Safe List
If you recognize the sender and are confident that the message is legitimate, select Add this sender to safe list.
Security Email Pro will remember the sender and will not display the phishing-content warning for future messages from that address.
Only add a sender to the safe list when you are confident that the sender is trusted.
Continue to Email
Select Continue to email to close the warning and view the message.
The warning itself does not delete or modify the email.
Suspicious Attachments
Security Email Pro checks email attachments for file extensions that may present a security risk.
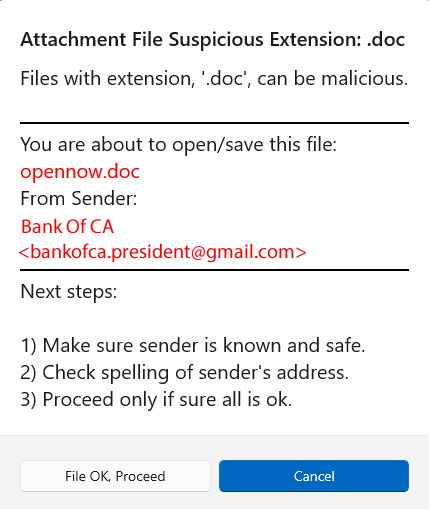
When a potentially suspicious attachment type is detected, Security Email Pro provides additional warnings before you open or save the file. This does not necessarily mean that the attachment is malicious. The warning gives you an opportunity to examine the file and sender before proceeding.
Suspicious Attachment Warning
Potentially suspicious attachments are identified in red in the email.
When you attempt to open or save one of these attachments, Security Email Pro displays a warning showing the:
File name and extension
Identifies the attachment you are attempting to open or save.
Sender
Displays the sender associated with the email so you can examine the address carefully.
Before proceeding:
- Make sure you recognize and trust the sender.
- Check the sender's email address carefully for misspellings or unexpected domains.
- Consider whether you were expecting the attachment.
- Proceed only when you are comfortable that the attachment is legitimate.
Open or Cancel
File OK, Proceed
Continues with opening or saving the attachment.
Cancel
Stops the action and returns you to the email.
If you are uncertain about an attachment, choose Cancel and verify it with the sender through a trusted method before opening it. By malicious, we mean 'Potentially Risky Attachment Type'.
Private Browser
From the left navigation bar, select the Browser icon to open the browser.
Browse Links with Greater Privacy
Security Email Pro includes a private browser for opening links without leaving the email application.
The browser is designed to reduce common forms of web tracking and limit the persistent browsing data normally left behind during everyday web use.
Privacy Built Into the App
Open links directly in Security Email Pro without automatically sending them to your regular browser.
Combined with the app's link-cleaning and tracking protection features, the private browser provides a more privacy-focused way to visit links contained in your email.
Image Codecs
Some email attachments use newer image formats that may require an additional Windows image codec before they can be displayed.
If Security Email Pro cannot open one of these image types, install the appropriate codec and then try opening the image again.
HEIC Images (.heic)
HEIC is an image format commonly used by Apple devices, including iPhones and iPads.
If HEIC images cannot be displayed, use the link below to obtain the required Windows codec.
AVIF Images (.avif)
AVIF is a newer image format used for highly compressed, high-quality images.
If AVIF images cannot be displayed, use the link below to obtain the required Windows codec.
Printing Email Messages
Security Email Pro allows you to print an email by first saving the message as an HTML file and then printing it from your web browser.
With the email you want to print open:
- Select Save HTML File from the controls above the email. If necessary, open the three-dot menu to access this option.
- Choose where you want to save the file.
- The email will be saved as an .html file.
- Double-click the saved file to open it in your default web browser.
- In the browser, select Print.
- Choose your printer and desired print options, then select Print.